Corvette C3 Fiero Seat Swap
Have you ever found the seats in your C3 uncomfortable on long
trips? In 1978 Corvette introduced a new seat style which is often
referred as the 'clam shell'. This newer style seat provided much better
support and became standard in all '79 and later C3 cars. Some C3 owners
with earlier cars have swapped their original seats for the later style.
Another option worth looking into is swapping your original C3 seats for seats
from a Fiero. Pontiac Fieros were built during the period 1984 to 1988 and
shared the same seats over the production run.
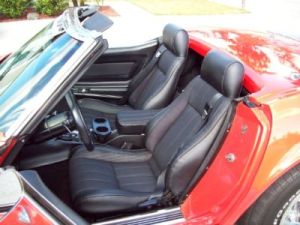
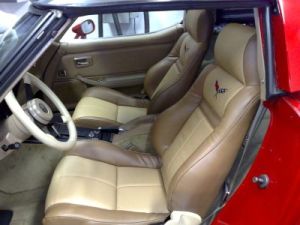
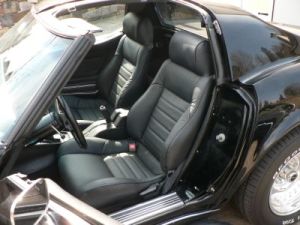
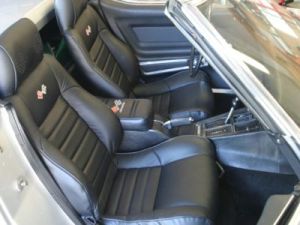
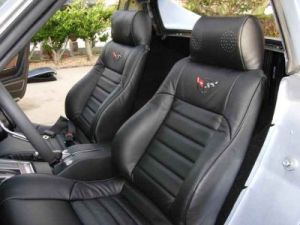
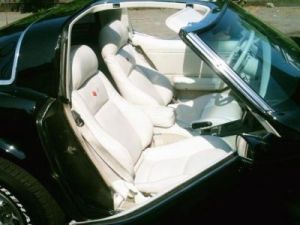
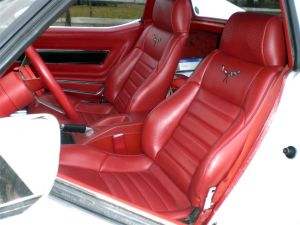
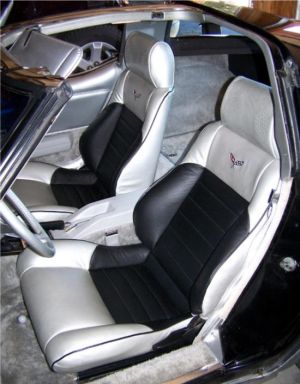
What makes Fiero seats so desirable for a C3? Well,
there are several factors and I will outline them below. But first, take a
look at some examples:
Fiero seats are very close to the same dimensions as your C3
seats. The Fiero seats provide more lateral support than the original C3
style. Although the Fiero seats are not direct bolt in replacements,
fabricating brackets to accept the original C3 tracks and mounts is a fairly
straight forward and simple task and I will be detailing those later.
Probably the number one reason for choosing Fiero seats is because there is a
company called
MrMikes Fiero that makes seat upholstery kits for these seats.
Not only does MrMike make kits in all Fiero styles but he also makes them in a style
for your
C3 Corvette complete with C3 logos. These kits come in a variety of colors and color
combinations to compliment your car. You can choose either leather or
synthetic material. In addition to all the necessary tools and supplies to
do the job, MrMike includes a comprehensive video detailing all installation
steps ensuring a professional looking job.
I am going to document my install below. I am not going
into any great detail as the video that you receive with your kit is very
comprehensive. However, I will detail the fabrication of the brackets that
you will need to do your install.
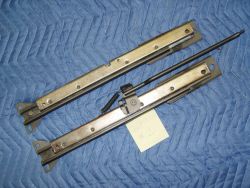
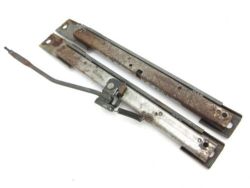
GM changed the design of the seat tracks over the C3
production years. In 1978 the new clam shell seat design was introduced
with the Pace Car option and this design became standard in 1979 and continued
until the C3 end of run in 1982. Two things remained constant throughout
the C3 run and that was the dimensions of the floor anchor bolt pattern and the
track to seat bolt pattern. The floor measurement track anchor bolt
distance side to side is 15 1/2". Since the seat pattern measurements are
different on the Fiero seats compared to the C3 original seats, these brackets
will align your seats properly using your original C3 tracks with the floor bolt
pattern. Please note that if your C3 has the clam shell seat design (1978
to 1979) your tracks will be one of two designs. If your tracks have a
raised bracket at the front you may wish to remove it so that your Fiero seats
will sit flat on the tracks which was the way they were designed. If you
choose to leave the bracket there you may find the installed height of your
seats to be too high. Below are some pictures of track design changes over
the C3 years.
1978 - 1982 (Raised Bracket Design)
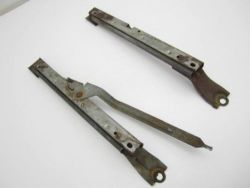
Many C3 enthusiasts have already made this swap and
some have chosen to modify the Fiero seat tracks to make them fit the
Corvette floor mounting holes. Using the Fiero tracks requires
much more fabrication than using your original C3 tracks. While
the Fiero seats are about the same dimension as your original C3 seats,
the Fiero seat tracks are mounted closer together and are shorter than
your C3 tracks. The simplest solution is to use your original C3
tracks and fabricate four brackets from 1/8" X 2" steel flat
stock. You will need a hack saw, bench vice, drill press and a
tap set to complete the task. You will also need (16) 8 X 1.25mm
Allen head machine screws. Here is a template with dimensions for
making the brackets:
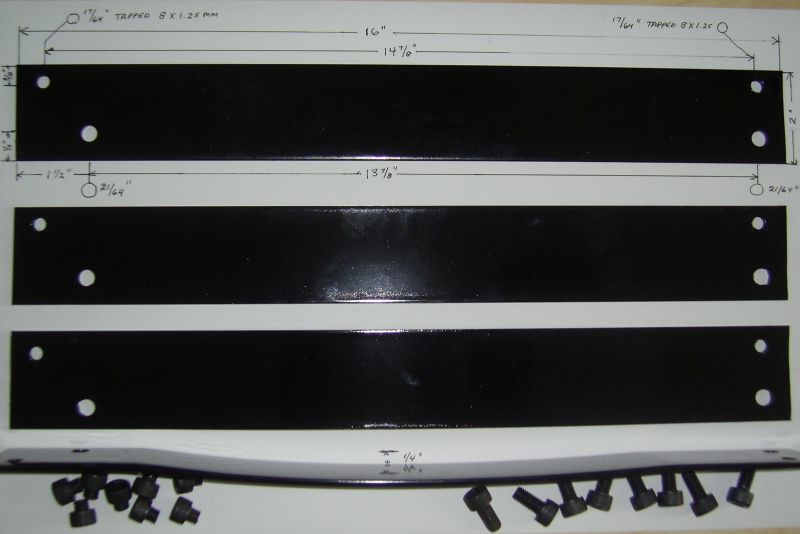
Fiero Seat Brackets for C3 Tracks and Mounts
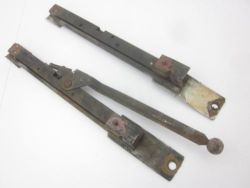
Just a few explanatory notes about the brackets. The two
top brackets are identical and the two bottom brackets are identical. Both
sets of C3 tracks are identical so you need a pair for each seat. All
brackets are drilled and tapped in the same configuration. Please note
that two of the brackets have a 1/4" curved indentation. This is to allow
clearance for the C3 seat adjust lever. Put that indentation in your brackets
before you drill the holes. The smaller holes (for attaching C3 tracks to
brackets) are drilled 17/64" and tapped 8 X 1.25 mm. The larger holes (for
attaching seat to brackets) are drilled 21/64". The longer metric Allen
head machine screws attach the brackets to the seats and the short ones attach
the tracks to the brackets. The end with the holes directly opposite one
another go to the rear of your seats. The centers of the larger holes for
the seat bolts are drilled 1/2" from the edge while the centers of the smaller
holes for the track bolts are drilled 3/8" from the other edge. These
dimensions will center your seat tracks on the floor mounting holes of your car.
Note that if you have a power driver seat, the power motor track assembly has a
different bolt configuration and will not work with the configuration of these
brackets.
Although I encourage
you to fabricate your own brackets using the instructions above, these kits
which include the four painted brackets and bolts are available for $170.00
USD which includes free shipping within Canada and USA. To purchase a set
using PayPal, contact
Adrian.
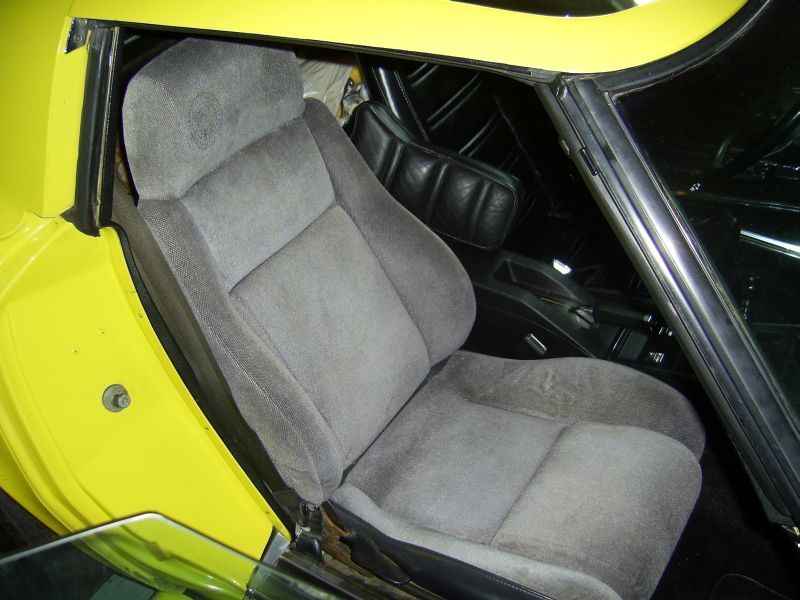
This is a test fit of one of my Fiero seats with the new
brackets and original C3 seat tracks and mounts. It was a perfect fit.
Fiero Seat in Corvette C3
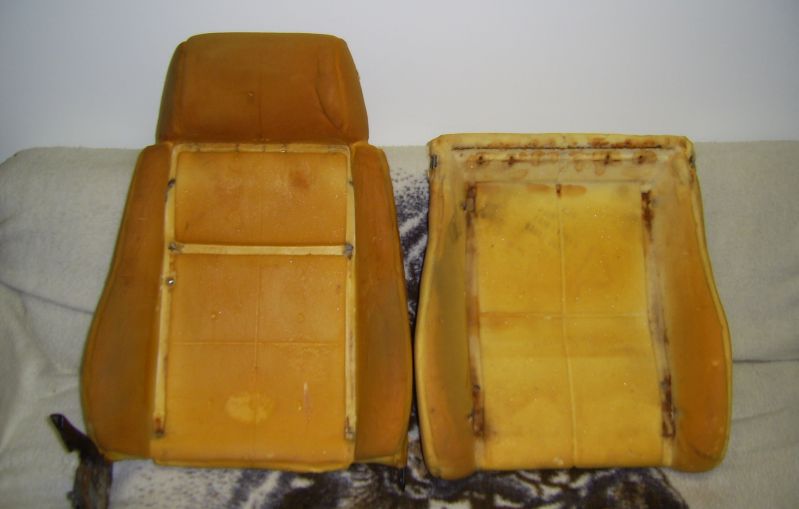
Stripping the old upholstery from your Fiero seats is
pretty straight forward. There are (3) bolts retaining the back
section of your seat to the bottom cushion. These seats were
assembled with metric bolts. Separate the seat halves before
removing the upholstery. I found that the best way to remove the
old hog rings was with a pair of pliers. Most of the hog rings
are connected to the steel seat frame and a twist with the pliers will
pull them out. There are a few that are connected to a wire strip
embedded in the foam so you need to be a bit more careful with those
ones. Once you have removed all the hog rings and steel anchor
rods, the original upholstery will come off and you will be down to
your bare seats. Check for any damage to the foam bolster
areas. If there is any damage you will need to follow MrMikes
instructions for repairing these areas. I would recommend that
you take an 8 X 1.25mm tap and clean out the threads on the seat
bottoms and back sections. Also, I would recommend that if there
is any surface rust on any of the exposed metal areas that you clean
these areas and spray a bit of paint on them. You do not want to
cover up any rusty areas with your new covers.
Please note that the bottom seat sections are interchangeable.
You may wish to consider swapping them as the bolster areas on the outer
departure side tend to become worn from getting in and out of them. By
swapping them side to side you will have the weaker sides against your console.
If you decide to swap them you will need to move the hinge nuts to the opposite
side of the seat. These just snap in. You may have to cut away a bit
of foam to seat the nuts on the other side.
This is a picture of my seats ready for the kit from
MrMikes
Bare Fiero Seats with Original Upholstery Removed
The Fiero seats have a plastic cover which mounts over the
seat adjuster mechanisms and hinge areas. These covers have a protruding
guide for the Fiero seat belts. This section of the cover will need to be
removed as there is not sufficient clearance for it when the doors are closed.
It would actually interfere with the C3 seat belt if you were to leave them on.
These guides can be cut off the covers without changing the cosmetic appearance.
Make sure you watch MrMikes video that accompanies the kit.
You may want to watch it a couple of times. If you follow his instructions
you will have an end product that you will be extremely happy with.
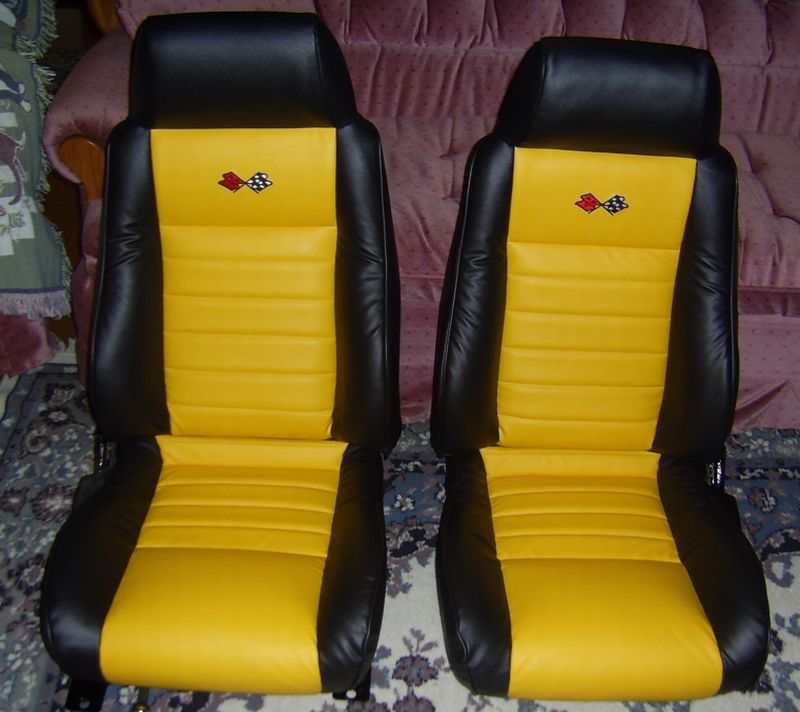
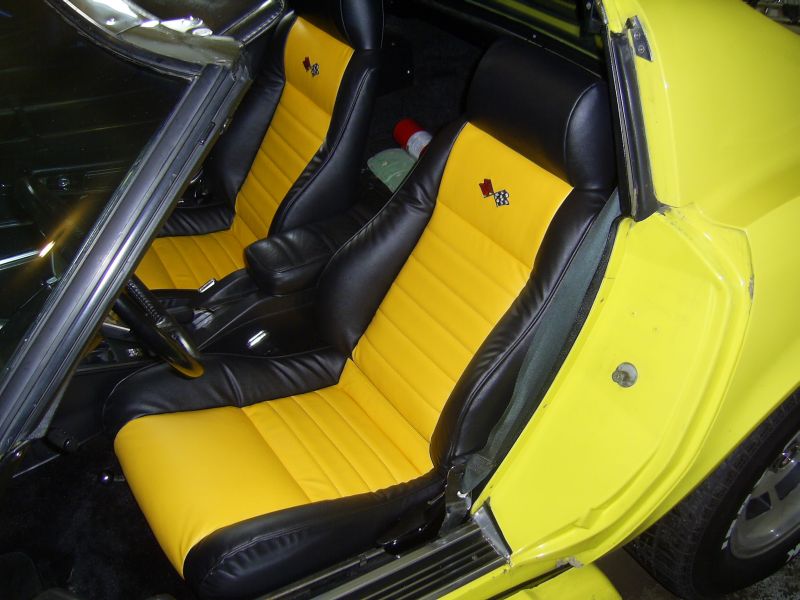
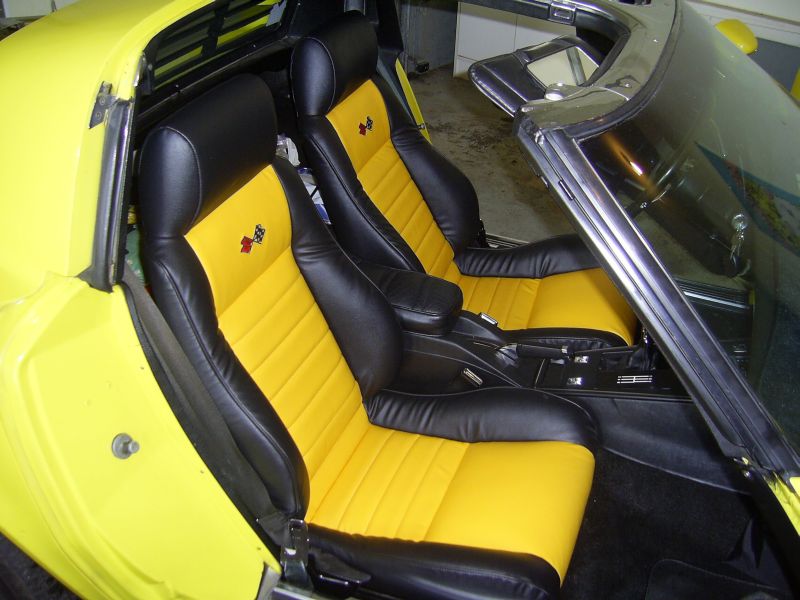
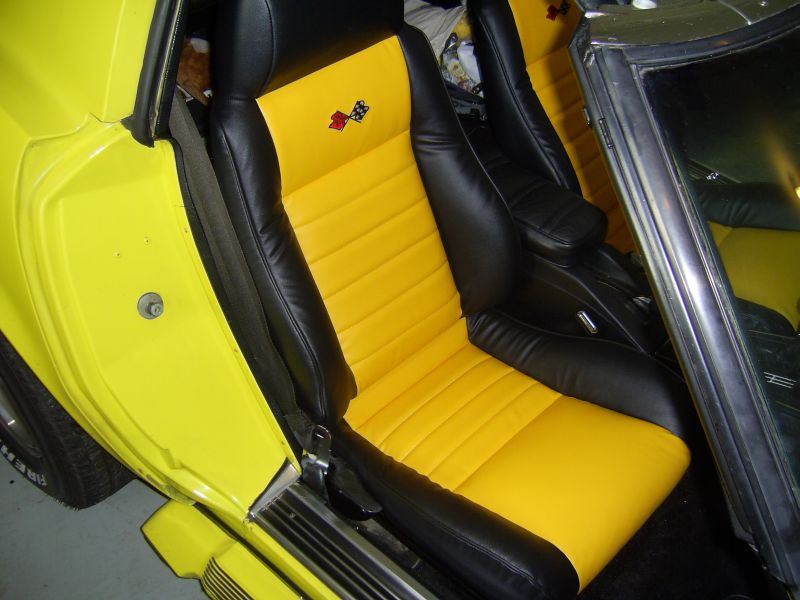
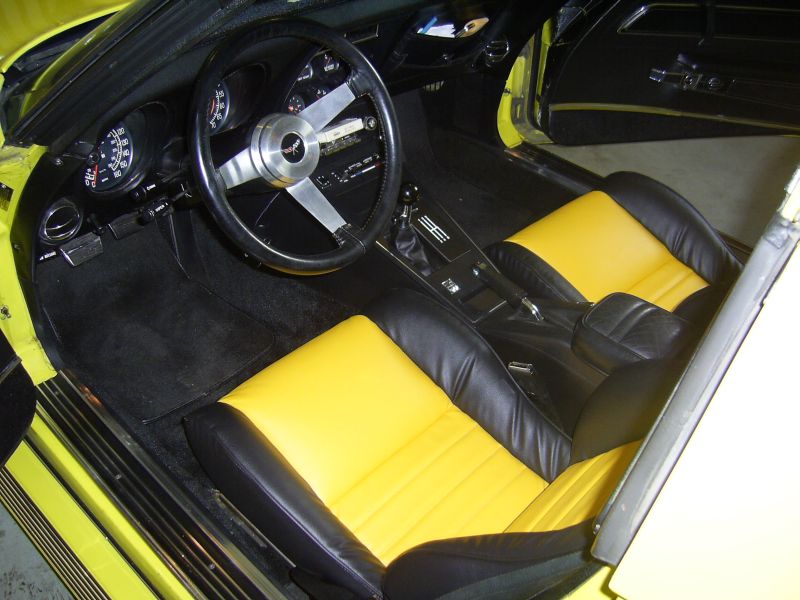
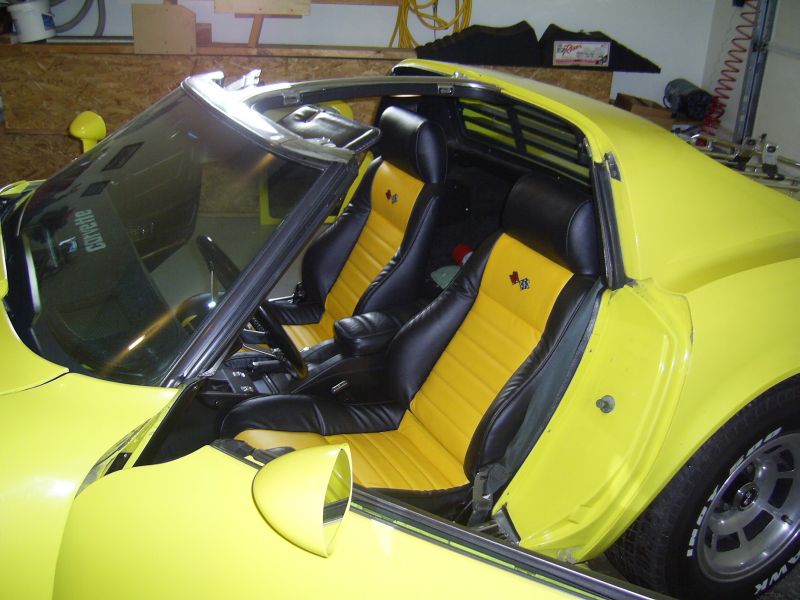
Here are some pictures of my finished seats. I am
extremely pleased with them and I highly recommend the kits from
MrMike.
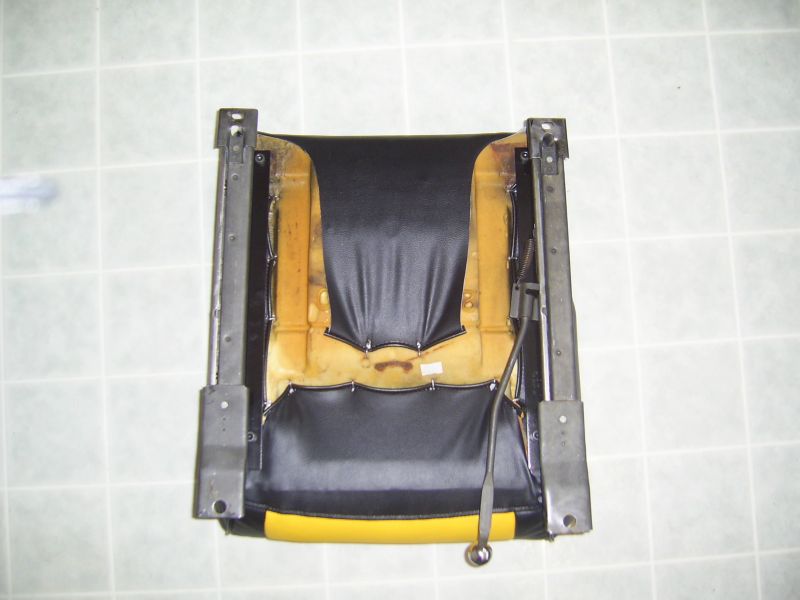
Bottom Section Covered and C3 Tracks Mounted
Both Seats Finished and Awaiting Installation