Corvette C3 Automatic to 5-Speed Conversion using a TKO-500 Conversion Kit
When you bought your Corvette, did you luck out and get the
transmission of your choice? In my case I did not. There were so
many other desirable selling features of this car when I purchased it that I
decided I could live with the original TH-350 automatic. Never in a
thousand years did I ever think that I would consider converting this car from
automatic to standard shift. While surfing the net one day, I came across
a kit for converting an automatic to 5-speed standard.
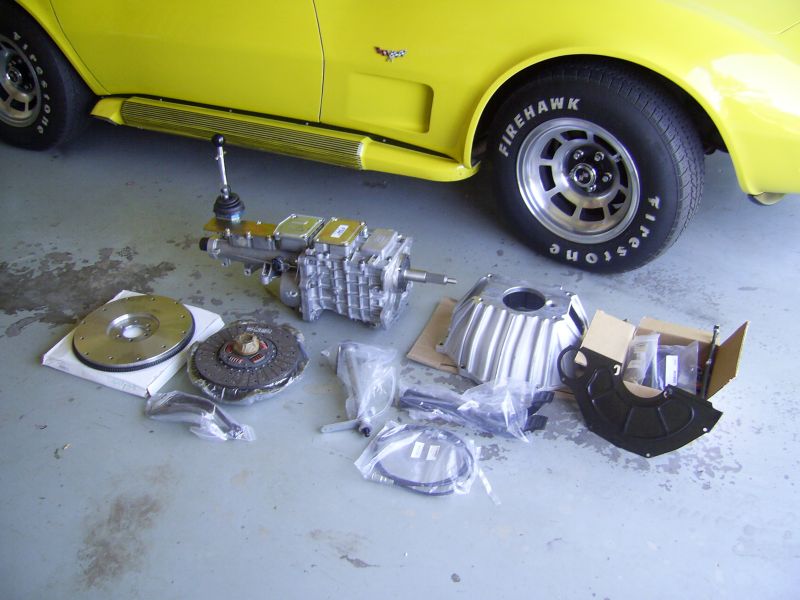
The kit included everything from the clutch pedal
assembly to the drive shaft and everything in between. These kits are
assembled by a few different companies who are authorized distributors for Tremec transmissions.
Although
these kits are available from third parties I highly recommend
that you deal directly with a respected distributor.
My purchase decision was based on four factors:
Desire for greater fuel economy
Desire to lower engine RPMs in an effort to extend drive train
longevity
Desire to lower the noise level in the cockpit without giving
up my side pipes
Desire for a standard shift Corvette
I have documented the entire installation process with dialog
as well as pictures. The installation went fairly smoothly, however, I
learned that all C3 installations are not the same. Differences in
body construction from one year to the next brings little challenges with the
installation. The installation that I am documenting here is for a 1977
(early production car - Dec 06, 1976). This is a low mileage, California
car with its original paint and spotless chassis.
The first thing you need to do is to carefully unpack all the
parts you received and do an inventory to ensure that everything is there. I was missing the
rear transmission mounting bracket and a few odd pieces for the clutch linkage
assembly. A quick call to the distributor had those parts on their way
in a flash.
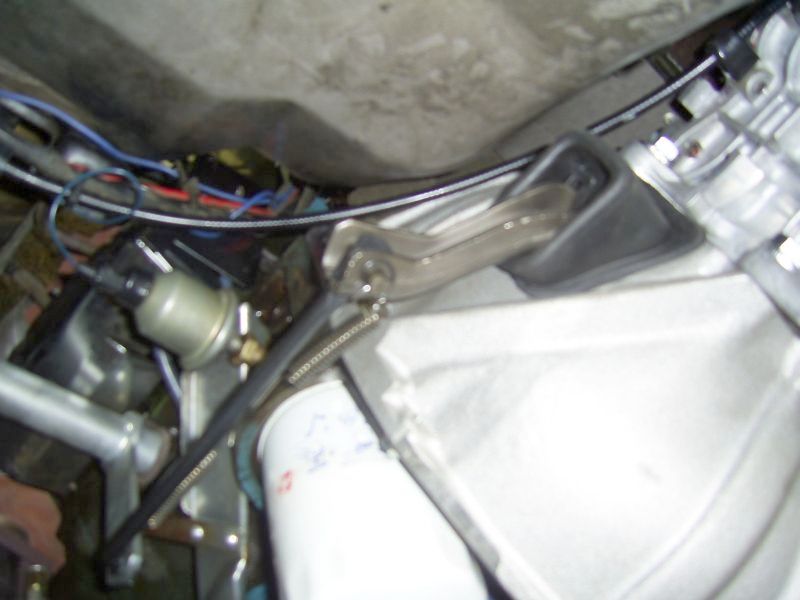
Unless you have an arc welder in your shop, while your
car is still mobile the first task is to find your favorite welding shop and
have the 'Z' clutch shaft bracket welded to the frame. It is easy to locate the
correct mounting point for the bracket if you install the ball stud on the
engine block. Assemble the 'Z' shaft with the mounting bracket connected
and then connect it to the ball stud on the block. Make sure the 'Z' shaft
is perpendicular to the drive train. The bracket should now be sitting on
the frame in the exact location and is ready for welding. It will be very
close to the brake lines and brake proportioning valve. It is a pain to
get at but eventually you will get a good bead of weld on all sides of the
bracket. It is easier to weld it from the top by coming down under the
brake booster.
The next step is to start taking off the parts you no longer will need. It
is wise to catalog every piece, nut and bolt that you remove, especially if you
have a numbers matching car. I can never imagine putting the automatic
back in but you never know what the next owner may want. Disconnect the
battery before you start to dismantle anything. I was fortunate in that my
exhaust system was not obstructing the transmission. If you have a
conventional exhaust system then you will have to remove a portion of it.
If your engine still has all the chrome radio suppression
conduit covering your distributor and wires, you will need to remove the rear
sections. At some point the engine will be tipping back on the mounts and
you do not want to damage your conduit. Also you will want the extra room to
remove the upper two bell housing bolts. It is easier to remove those
bolts first before you start working under the car. During reassembly you
will have lots of room to install those bolts from below.
I drained the transmission before removing it although you
may chose not to do that. You will need to disconnect the transmission cooling
lines, speedometer cable, shift cable, down shift cable from the carburetor and
modulator line from the vacuum port on the intake. You will need to block
that port off since you will no longer need it. The kit does not include
the fittings to plug the holes in your radiator where you removed the lines.
It also does not include a cap for your vacuum fitting.
You will now need to detach the driveshaft from the front
yoke and the differential and then remove it. You will have a new
driveshaft so you can store the original one away. You will probably want to
leave the yoke in the transmission especially if you did not drain the fluid.
Remove the inspection cover from the bottom of the transmission bell housing.
Remove the bolts holding the torque converter to the flex plate. This is
also a good time to remove the starter. You now need to remove the
remaining bolts securing the transmission to the block.
NOTE: The starter for an automatic
has a different nose cone than that of a standard. You will need to
acquire the correct starter for a standard (cast iron cone versus aluminum for
automatic).
You now are ready to remove the rear cross member.
Before you do that you will need to disconnect your emergency brake cable and
remove the two bolts securing the transmission to the mounting bracket.
Once you get the cross member out you will be removing the original bracket and
replacing it with the new one in your kit. There are now only six bolts
left to be removed and those are at the ends of the cross member. Before
you start removing those you need to support the transmission. How you
support it depends on your method of removal. I used a transmission jack
to simplify that process. Once the transmission is supported you can now
remove the bolts retaining the cross member. Pull the transmission back
about an inch to clear the torque converter from the crankshaft. You now
can lower the transmission and pack it away. I would suggest that you
secure the converter to the transmission. If it happens to slip off you
will have a mess on your hands.
Remove the six bolts securing the flex plate to the
crankshaft. Pack the flex plate away as it will no longer be needed.
You can now wash your hands as you will be moving inside
the car to dismantle the console, remove the steering column, instrument cluster
and etc. I decided to remove the driver's seat to give me more room to
work inside the cockpit. I also removed the sill plate so that I would not
be scratching it while working inside the car. Remove the sides and the top of the
console. You do not have to remove the center instrument cluster.
Unplug the harness for the neutral safety and back-up lights. Remove the
four bolts securing the shift lever to the top of the transmission tunnel.
Disconnect the shift cable and pull it down through the tunnel. Pack the
cable away as you will not need it. Remove the lever assembly.
1977 was the first
year for the steel floor and depending on whether the car was going to be an
automatic or standard the floors were stamped differently. With the
fiberglass
floors used right up to 1976 there were no differences in the panels.
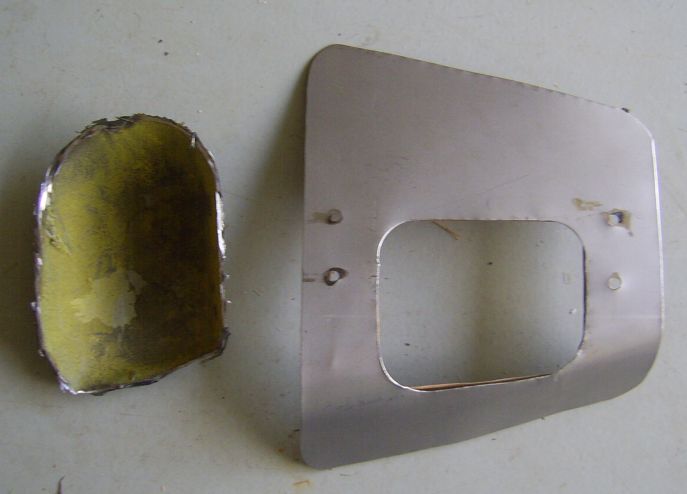
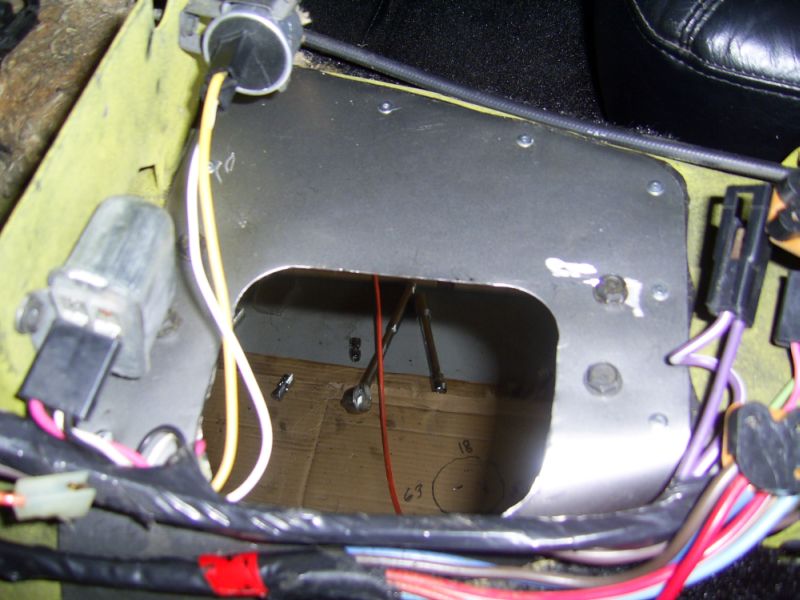
After removing the automatic shift mechanism from the tunnel you will see an
indentation under it. This indentation happens to be right where the standard
transmission shifter comes through the tunnel. This
needs to be cut out. In the next picture you will see the piece that I removed
with a cutting wheel on my hand grinder. I will keep that piece in case someday
somebody wants to reinstall the automatic but I don't think that person will be
me  .
Beside it you will see the piece that I fabricated to cover the hole I cut out.
That piece has the correct cutout in it to accept the inner boot that came
with your kit. The four holes drilled in the cover line up with the bolt
holes in the tunnel that secured the automatic shift lever.
.
Beside it you will see the piece that I fabricated to cover the hole I cut out.
That piece has the correct cutout in it to accept the inner boot that came
with your kit. The four holes drilled in the cover line up with the bolt
holes in the tunnel that secured the automatic shift lever.
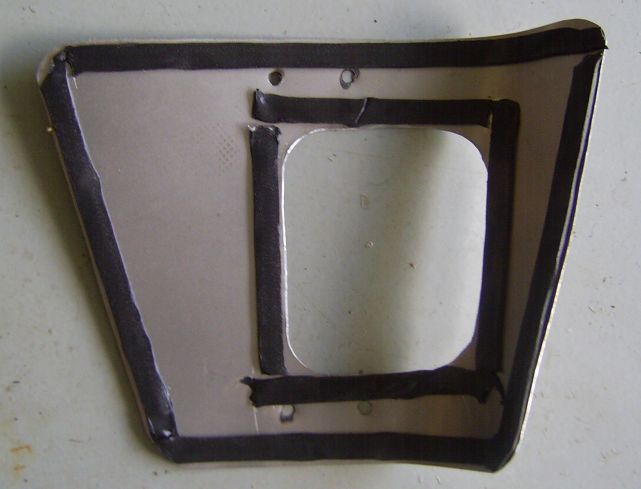
The next picture shows the back side of my fabricated piece. I
have placed some automotive sealing tack (1/8" X 1/2") around the perimeter to
seal it to the tunnel. I will also use some seam sealer on the underside to hide my cut and pop rivets.
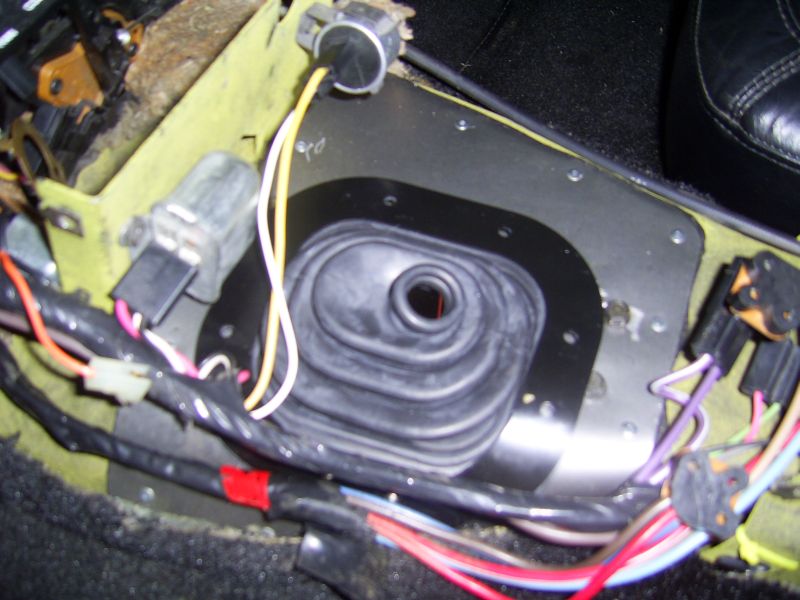
The next picture shows the fabricated piece now installed. I used the same four
screws that held the automatic mechanism plus some pop rivets to hold
the piece in place. This
now has the identical dimensions and shape that the 4 speed cars have and the
shift tower of your TKO 500 will line up properly within the opening.
The next picture shows the inner boot lying over the opening. You can
drill the holes for the boot after you see that the TKO fits up through
correctly. I painted the fabricated piece yellow before I screwed the boot down.
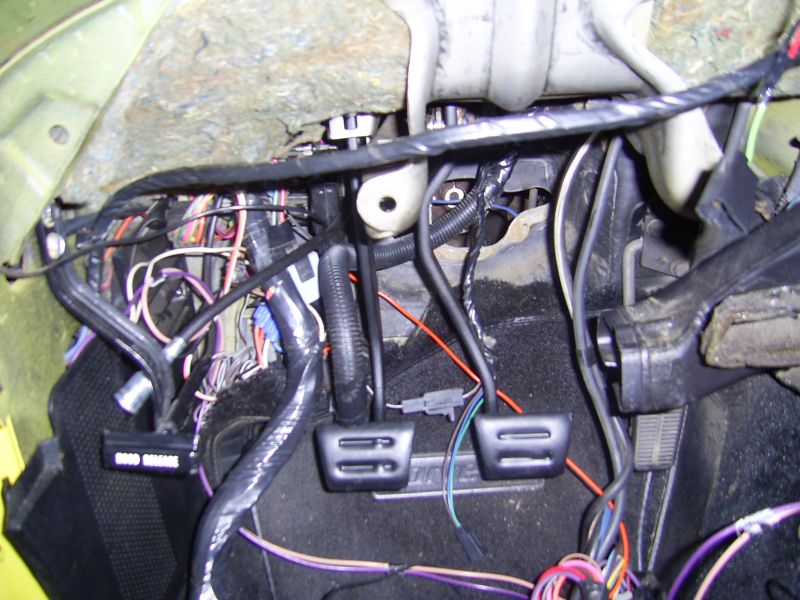
You can now move on to the task of installing
the pedal assembly. You need to remove the steering column, instrument
cluster and the steel brackets that support the steering column. I would
suggest that you mark the positions of the bolts in those brackets so that you
get them lined up properly when you reassemble them. A wax pencil will
work fine.
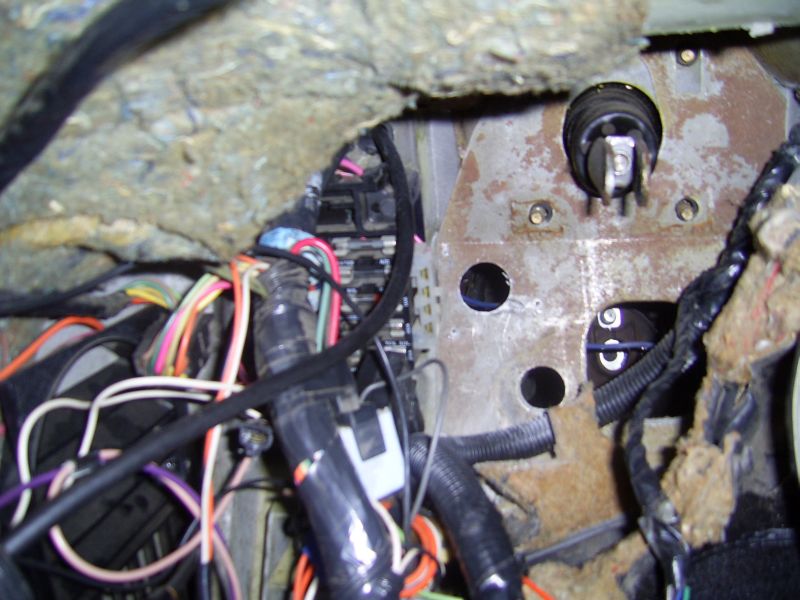
You now need to remove the brake pedal
assembly. This task requires you to remove the nuts holding the
brake booster to the firewall. Pull the booster back enough so that the
four studs will clear the bracket. There are also four bolts in the wiper cavity
that have to be removed as well. The hole for the clutch rod must be
punched through the firewall. The hole is already there in the steel
support but the fiberglass panel is not punched. You will also need to
drill out the three holes for the rod boot which is secured with three screws
from the backside.
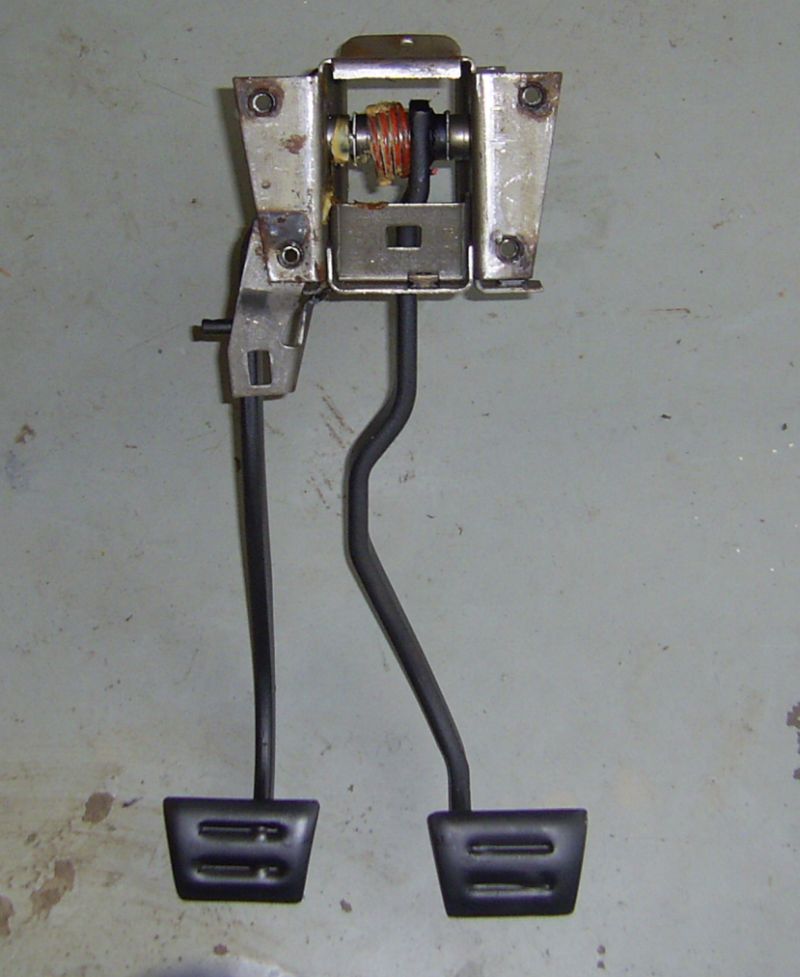
Once you have removed the brake pedal assembly, you can disassemble it.
You will no longer need the old brake pedal lever. Reassembling with the
new pedals provided is a simple job. I just replaced the bushings and added
some grease. The clutch and brake pedals are refurbished original Corvette.
NOTE: You will notice a slot in
the bracket above the clutch pedal. This slot is for the rubber bumper
which cushions the pedal when it returns. The cushion comes with the kit.
The one that came with mine was 3/4" in thick. This is much too thick.
The cushion should not be more than 1/4". You may have to cut yours down
like I did if that is the case. If the cushion is too thick you may not be
able to get the correct travel in your clutch pedal. The clutch pedal will
be at least 1 1/2" back beyond the brake pedal.
The next picture shows the pedal assembly installed.
Now connect the clutch rod to the clutch pedal. There is a thick washer
that goes over the pin first, followed by the rod and then a spring clip.
You can reassemble the steel brackets, instrument cluster. It is a
good idea to feed your new speedometer cable through at this point and connect
it to the cluster. Before you
reinstall the steering column you will want to go under the car and install the
rubber boot over the clutch rod. This boot goes on with three screws also
included in your kit. This is also a good time to permanently install the
'Z' shaft. Make sure you install the nylon bushings and grease them.
Also don't forget the grease seals on each end. There is a special lock
tab that goes over the frame side ball stud before you secure it to the bracket.
Once tightened then bend the tab down to lock the nut in place. You can
now connect the clutch rod to the 'Z' shaft. You will be making a final
adjustment later but for now leave about 1 1/2" of thread below the bottom
adjusting nut.
You can now reinstall the steering column. Install the clutch return
spring from the 'Z' shaft to the firewall bracket that retains your steering
column. Your linkage assemble is now complete from the clutch pedal to the
'Z' shaft. You will want to fill the 'Z' shaft with grease at some point.
You will see the hole in the bottom of the shaft for a grease fitting.
Once filled you can leave the fitting there or replace it with the little red
plastic plug included in your kit.
The first thing that you should do
now is ensure that the surface of the block where the bell housing attaches and
the hole at the end of the crankshaft are clean. You might want to touch
them up with fine emery cloth and clean them with solvent. You are now
ready to install the pilot bearing in the end of the crankshaft. You can
push the new bearing in with the proper tool if you happen to have one. If
not, you can use a socket with a slightly smaller diameter than the bearing and
tap it in with a light hammer. Make sure it is lined up properly and push
it in until the side of the bearing is flush with the hole in the crankshaft.
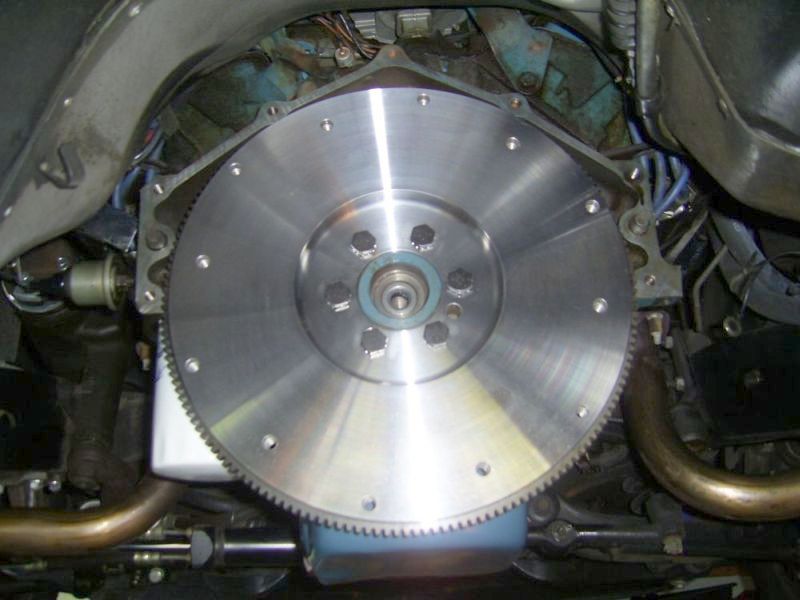
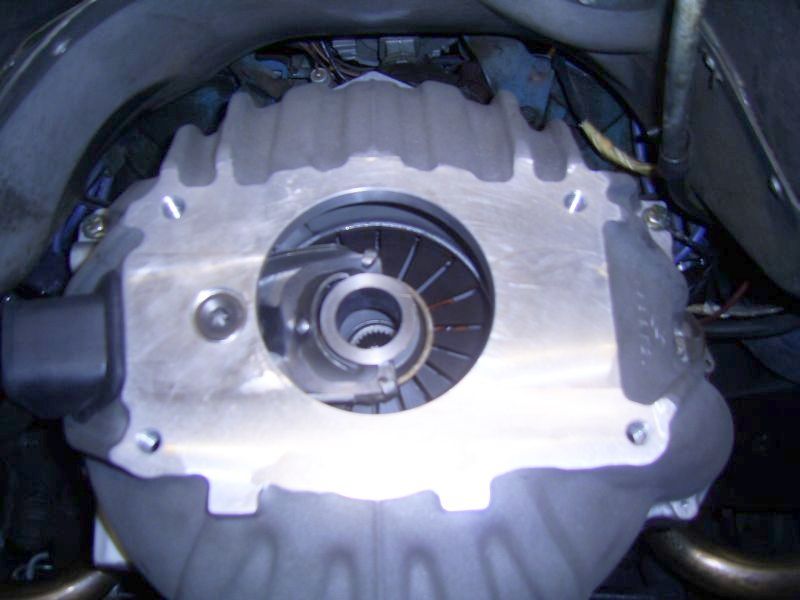
You are now ready to install the new Flywheel.
Use the new bolts that came in the kit. The flywheel will fit tight over
the end of the crankshaft. If you are drawing the flywheel up against the
crankshaft with the bolts be sure and do it evenly. Torque the bolts to 60
ft/lb.
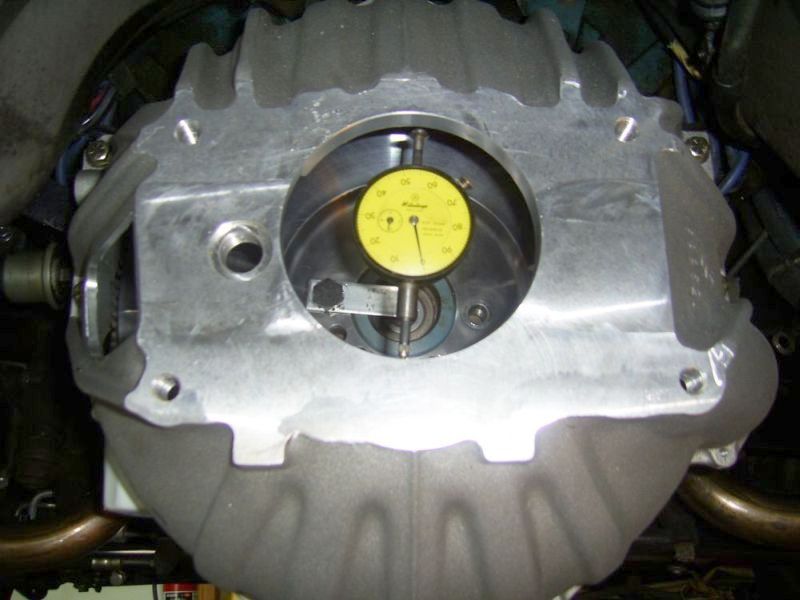
The next procedure that you will be performing is both
critical and crucial to the long life and
performance of your transmission. Basically, you need to determine the
alignment of the engine crankshaft relative to the transmission opening in your
new bell housing. You will require a dial gauge calibrated in 1/1000
increments. You will need to devise a way to attach the gauge rigidly to
the crankshaft so that upon rotation you will be able to obtain readings on the
inside perimeter of the bell housing opening. In my case I was able to
fabricate a bracket secured to the crankshaft with one of the flywheel bolts.
Ensure the bell housing is torqued properly to the engine.
Zero the dial gauge at 6 o'clock. Rotate the flywheel clockwise and record
the dial readings at 9, 12 and 3 o'clock. You will want to do this
procedure two or three times to ensure accuracy. If any of your readings
are outside the 0.005 allowable limit then it will be necessary to install
offset dowel pins in order to correct the misalignment. My readings were
outside the tolerances and I had to install new pins. You will need
to call your distributor support to discuss the readings and the solution.
If you have to install new dowel pins, drive the old ones out of the block by
pushing them through from the front side. After installing the new pins
repeat the dial procedure again. Once again if you feel your readings are
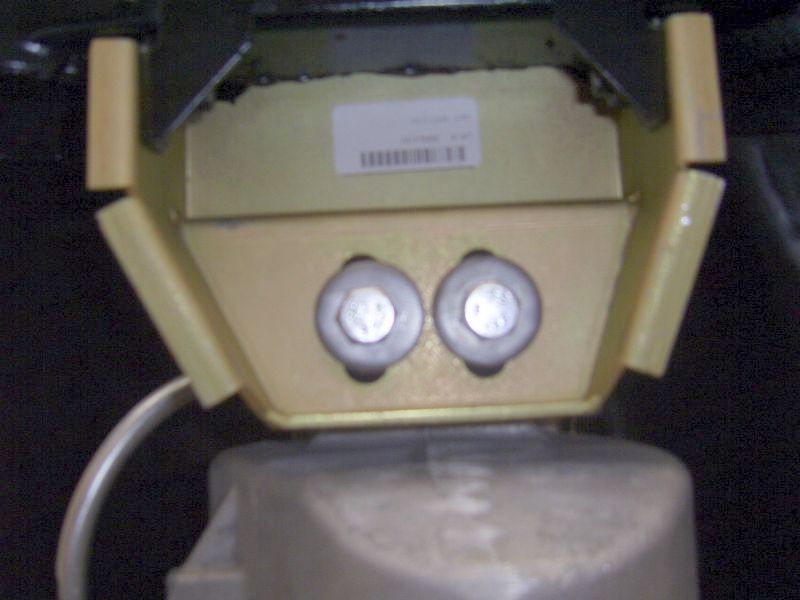
questionable, call support In the next picture you will see the offset
dowel pins in place. The bell housing is now dialed in to specs.
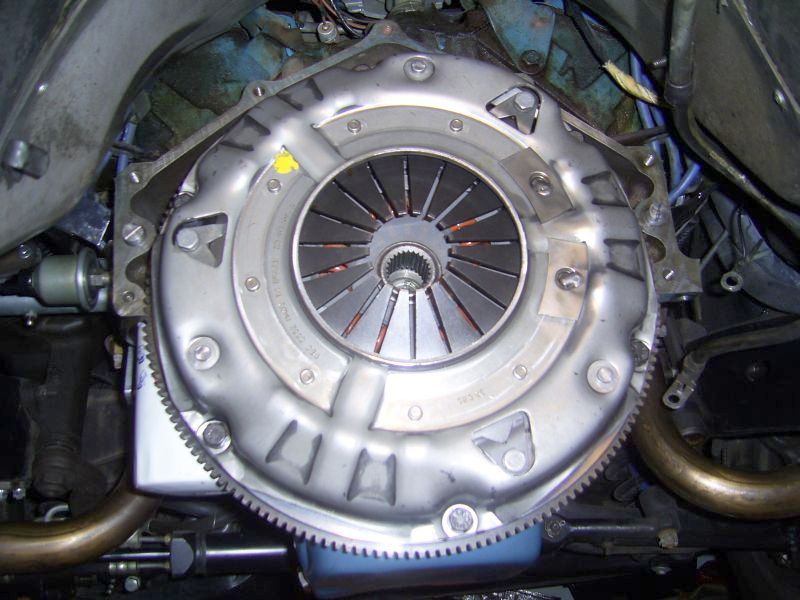
You can now install the 11"
clutch and pressure plate. Ensure the flywheel and pressure plate are
clean and free of oil and grease. You can lubricate the spline of your
clutch with the lubricant supplied. You might also want to slide the
clutch over the input shaft of your new transmission to ensure that it slides
freely. Make sure you use the clutch alignment tool
that came with your kit when you are tightening down your pressure plate..
Before you install the bell housing it is a good idea to temporarily bolt your
new starter on and check the clearance of the pinion teeth against the flywheel.
It is much easier to check that now than later. If your old starter did
not have shims then you probably will be fine but that is no guarantee. My new
starter was fine without any adjustments. You will have to remove the starter
now or later to install the inspection cover
You can now install the clutch fork pivot stud in the bell
housing. Remove the clutch release bearing from the packaging. You
will want to lubricate the bearing where it slides on the transmission shaft.
You might want to push the bearing over the shaft of your transmission just to
make sure it travels freely. Attach the new clutch release bearing to the
fork. Make sure the spring clips are inside the groove on your bearing.
Attach the fork to the pivot stud. You can now install the bell housing
with the new bolts that came with your kit. Be sure to torque them to
specifications. You can now install the inspection plate and starter.
You can also connect your 'Z' shaft to the clutch fork with the new rod included
in your kit. Attach the two anti-rattle springs to this rod.
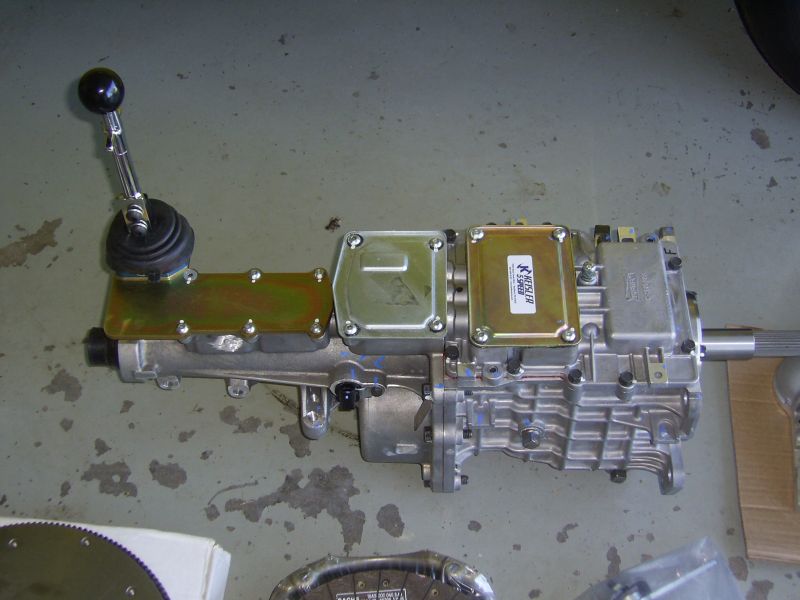
You are now ready to prep the transmission for the install. Fill the
transmission with GM Syncro Oil. It will take a little better than two and a half quarts.
Remove the shift tower from the TKO to allow clearance for the transmission at
the back of the tunnel.
Secure the transmission to the jack. Jack the transmission up into the tunnel. There is lots of room to do that
since the cross member is removable in the automatic cars. The transmission
should slide into place very easily. It took all of two minutes to slide mine into place.
The fact that it went in so easy was reassuring as that indicates that the bell housing
was dialed in correctly. Bolt the transmission to the bell housing with
the bolts supplied in your kit. Torque to specifications.
Check to make sure that the shift tower lines up properly with the hole you
fabricated in the tunnel. You can now bolt the rubber mount to the
transmission using the new bolts supplied. Bolt the new transmission
mounting bracket to your cross member. You can now bolt the cross member
back in the frame using the original bolts that you removed. Drop the
transmission down on the mounting bracket and secure with the new bolts
supplied. My mount aligned perfectly with the holes in the mount.
You can now remove the jack.
You now need to install the speedometer cable, connect the backup light and
neutral safety switch. I purchased a piece of 3/8" plastic wire conduit
and fed it through the same hole that the automatic shift cable went through the
tunnel. That makes a neat job and also plugs that hole in the large rubber
grommet. You can connect your wires to the same sockets that you unplugged
from the neutral safety and backup light switch on the side of your automatic
shift mechanism. All that remains under the car now is to install your new
driveshaft and reconnect your emergency brake idler wheel. Remove the yoke
from your driveshaft. You can either remove the rubber plug from the
transmission tail shaft or you can push it back on the shaft with the yoke when
you push it in. I removed the plug out of mine. Be careful not to
damage the seal and dust cover if you decide to pull the plug out. Now
install your driveshaft. Bolt the differential end first and then the
front joint on the yoke. Connect your emergency brake.
All the remains to be done is to install the shift lever tower, the lever and
inner boot. You will want to check your clutch adjustment. It is
easier to do that task from above. A stubby open end 9/16" will work
perfect to make any adjustments.
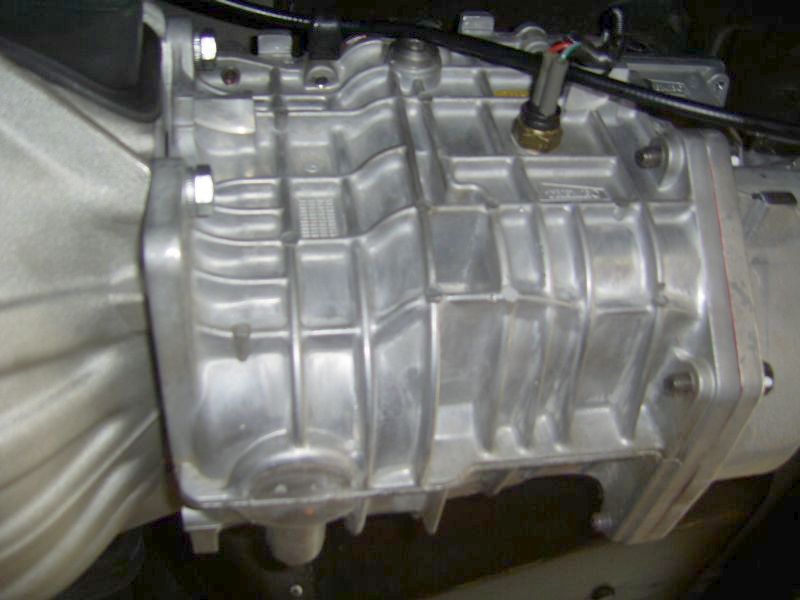
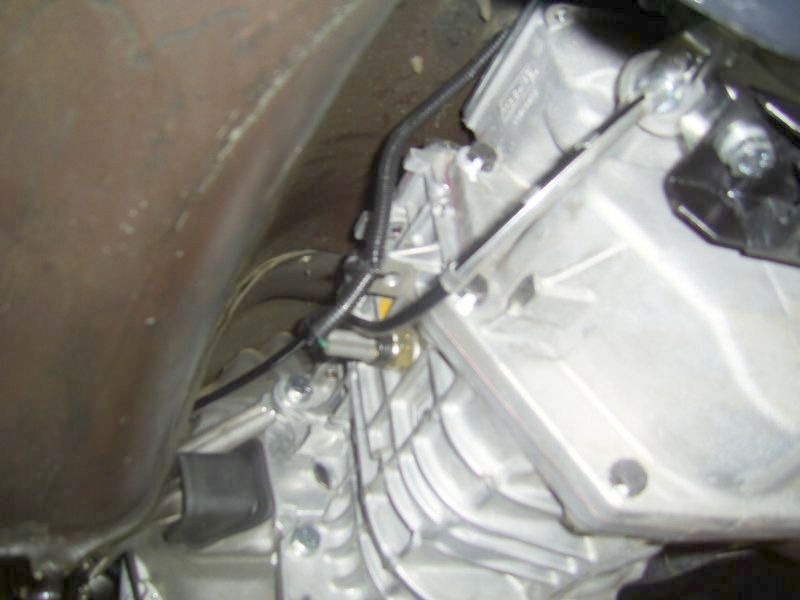
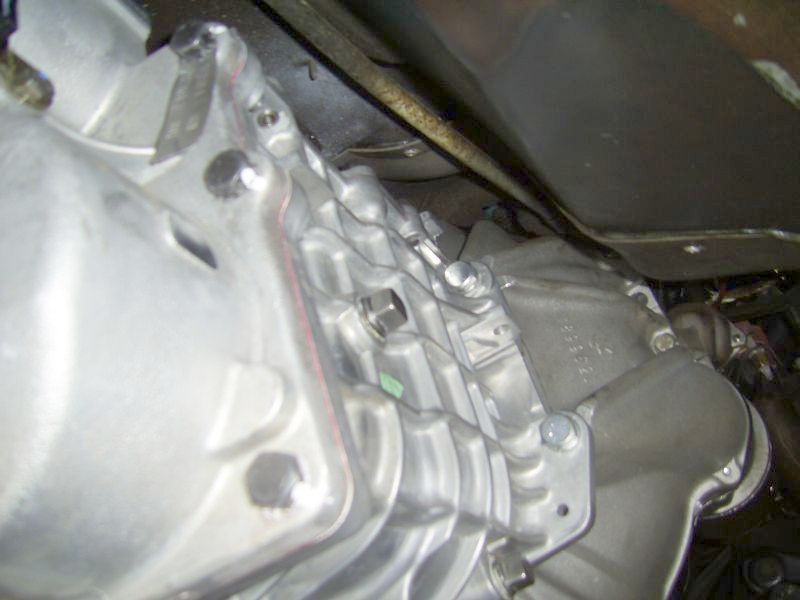
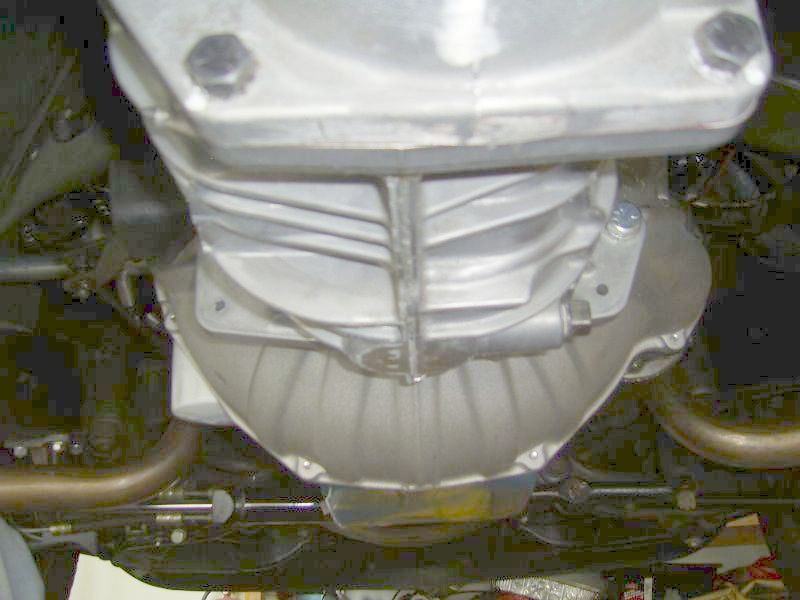
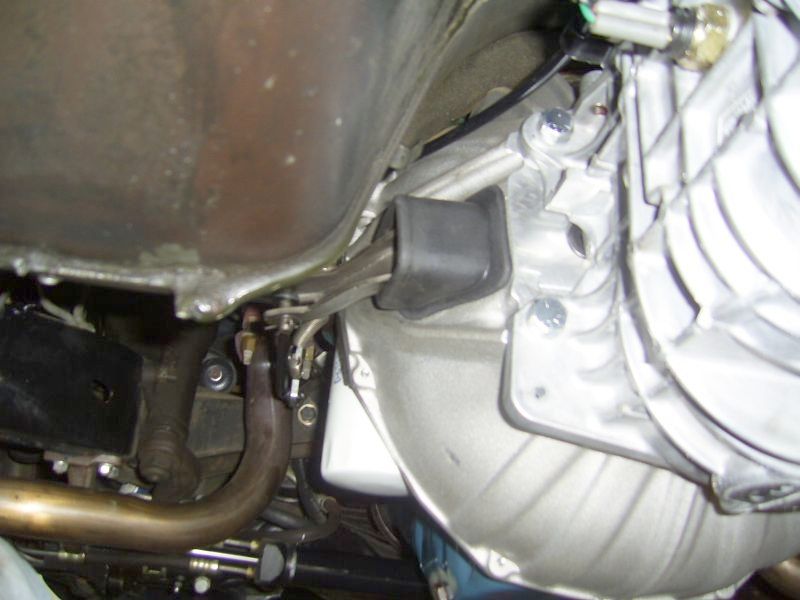
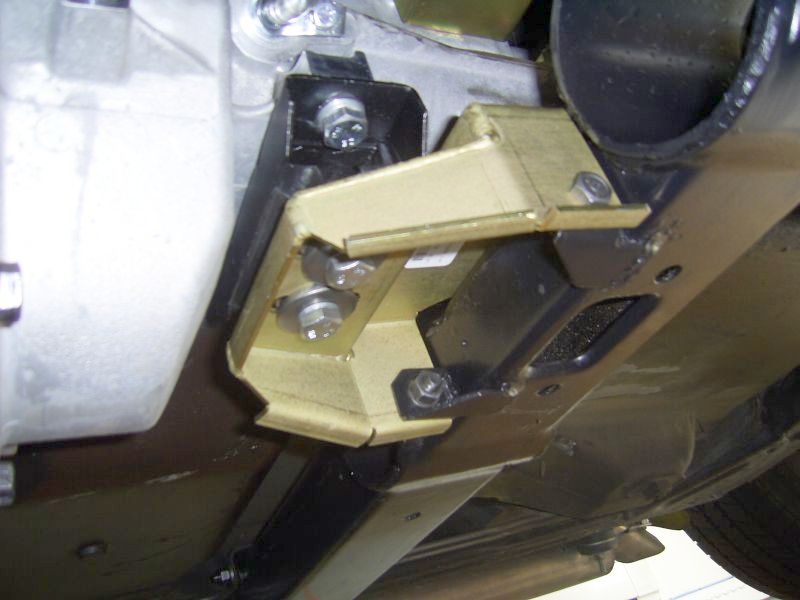
The following pictures show various angle shots of the completed installation as
it looks from under the car.
Install the shift tower on the transmission using the two hex head bolts you
removed earlier. Ensure that the tower is positioned correctly. It
will go on 180 degrees but I don't think you would like the lever angle
. Lubricate and
seat the ball correctly in the socket and insert the two hex screws in the
clamp. Install the protective cover over the bottom of the tower with the
two screws provided. You might want to apply some sealant around the
contact edges of the cover. I also fabricated a rubber boot to cover the
top of the tower as well. This helps to keep any foreign material from
getting into the shift tower from below. You can now bolt the shift lever
in place. These hex bolts need to be tightened securely.
I then secured the inner boot to the tunnel using metal screws. I
drilled 1/8" pilot holes for the screws. These screws were not in my kit
but they are just standard sheet metal screws. You can now assemble the
console. Install the driver seat and scuff plate if you removed them.
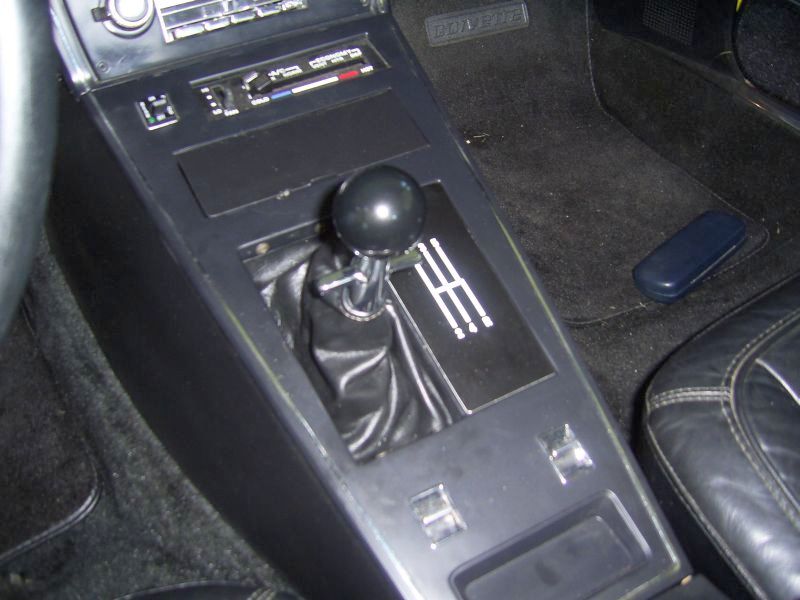
The last thing to do is install the shift plate on your console. Reality
should be setting in at this point
.
Connect the battery cables. You should be getting pretty excited at
this point in time
.
Push the clutch pedal to the floor to see how it feels. You should have
enough travel in the pedal to disengage the clutch as well as some free play at
the beginning of the pedal. You should be able to shift through all of the
gears in your transmission. Shifting will be very firm and tight until you
have a few miles on the transmission. When you are happy with your clutch
adjustment, the magic moment has arrived.
Make sure the transmission is in neutral and start the car. Push the
clutch and check to see that you can shift gears without any grinding. You
are now ready for the test drive. Listen for any noises or vibrations.
The transmission will shift tight for a while during the break in period.
I now have over 300 miles on my installation and the transmission is just now
starting to shift smoothly. The transmission is very quiet without any
vibrations or noise. All I can hear is my side pipes until 5th gear and
then utter silence ...... well not quite
.
I will certainly add additional comments here after I have driven the car for a
while.
And on side note if your car does have cruise control it will work fine with
this transmission. If you want to know how to set it up properly and
safely just drop me an email. All it involves is installing another vacuum
switch over your clutch pedal and teeing into the line coming to the switch over
your brake pedal. Ask me how to get the speedometer cable to connect to
the transducer. I won't tell you how to do that here ... I don't want to
give out all my ideas
.
Once I installed the new transmission, I realized the car was so much fun to
drive that I wanted some extra horses up front. Over the past winter and
spring, I made several modifications to the car. After many hours of
research, I decided to purchase a new GM ZZ4 crate engine. Click on
new engine to check out the details. I also switched
my mechanical clutch linkage over to hydraulic release.
I also added a
Steeroids rack and pinion kit,
monospring suspension (both front and rear) and Billstein Sport shocks. I
now have over 1500 miles on the car after making the changes. The power
train combo is awesome. The only thing I would do differently and I will
eventually, is to move from the original 3.08 gears to 3.55. That gear
combo will allow me to make better use of 5th gear in the TKO.
I replaced my original 3.08 gears with 3.55 and the difference was WOW!
This improved both performance and fuel consumption. I am now able to
cruise in 5th gear at 50 mph with lots of power from the ZZ4.